Loading

Archives October 2026

Water management depends on clear drainage paths, coordinated thresholds, and properly detailed connections to the surrounding wall. Review these conditions alongside the selected window, door, storefront, or curtain wall system

Glass and Aluminum Solutions for Coastal Buildings

Home / 2026 / October

A coastal hotel may have large windows facing the ocean, glass doors opening onto terraces, and an entrance sheltered beneath a canopy. These openings serve the same building, but their exposure to salt-laden air, moisture, and wind can differ considerably.

These conditions affect more than the visible glass. Aluminum finishes and metal hardware need attention where salt deposits collect, while glazing edges, seals, and drainage details influence how the opening handles moisture. The review also needs to cover the connection between the frame and the surrounding wall.

Selecting glass and aluminum systems for a coastal building starts with the conditions at each opening. Once those are understood, the project team can coordinate framing, glass, hardware, and installation details for residences, hotels, storefronts, and other commercial spaces.

Coastal exposure requires attention to aluminum finishes, hinges, locks, and fasteners. Specify these components for the intended environment and provide access for cleaning and inspection.

How Coastal Exposure Changes Across a Building

Distance from the shoreline helps describe a site, but elevation drawings should also identify openings facing open water and those sheltered by balconies, canopies, or roof projections. This information helps the supplier understand the exposure at each part of the building.

Consider a residence in San Diego with an ocean-facing window wall and a recessed entrance. The glazing may occupy a broad, exposed elevation, while the entrance sits beneath a roof. Record those differences alongside opening dimensions and operation. For a renovation in La Jolla, also document the condition of the existing openings, the scope of frame replacement, and the wall connections needed for the proposed design.

Wind requirements belong in this early assessment. The project’s structural criteria should account for site exposure, building height, and the position of the opening. These criteria help determine the required glass, framing, and anchorage. Resistance to wind pressure and protection against windborne debris are distinct requirements; identify both where applicable.

A sheltered opening still needs appropriate materials and maintenance. Describe its protection on the drawings without assuming that a canopy or balcony removes exposure to airborne salt.

Aluminum Finishes and Hardware Need to Match the Exposure

Salt deposits left on aluminum surfaces can contribute to corrosion in coastal environments. Finish selection and regular cleaning work together to address this exposure. Identify the finish type, its performance requirements, and the supplier’s conditions for coastal use in the specification.

Finish color does not establish finish performance. For coated aluminum, FGIA’s AAMA 2603, 2604, and 2605 specifications address organic coating performance. Anodized aluminum is covered by a separate specification, AAMA 611. Use the specification relevant to the proposed finish, then confirm its suitability and warranty conditions for the intended exposure.

Review hinges, locks, operators, and fasteners alongside the frame finish. Their materials and protective finishes should suit the exposure, and adjoining components should be checked for compatibility. For coastal doors, describe the hardware requirements as clearly as the requirements for the frame.

For an ocean-facing terrace entrance in Miami, include the exposed hinges, handles, and locking components in the supplier discussion. At a renovation in South of Fifth, Miami Beach, also establish how the owner will reach exterior frames and hardware for cleaning and inspection.

Plan access for cleaning and inspection before finalizing the configuration. Obtain the manufacturer’s maintenance instructions for exposed surfaces, operating hardware, and drainage openings. Follow the specified restrictions on cleaners, lubricants, and other products used on these components.

Choosing Glass for Safety and Thermal Requirements

Laminated Glass and Project-Specific Safety Requirements

Laminated glass consists of two or more glass panes bonded with an interlayer that helps retain fragments after breakage. It can form part of a specified safety or impact-resistant assembly, depending on its composition and the supporting system.

Where impact protection is required, the relevant documentation must cover the proposed glass, frame, dimensions, anchorage, and installation conditions. Laminated glass alone does not establish the impact rating of a complete window, door, or facade.

Moisture exposure also matters at the glass edges. The National Glass Association’s guidance on laminated glazing edges explains that prolonged moisture contact and inadequate drainage can affect certain interlayers. Effects may include a whitish haze at the edges or delamination, depending on the materials and conditions.

Specify edge details that address moisture exposure, and verify the compatibility of sealants, gaskets, and setting blocks that may contact the interlayer. The suppliers of these materials and the interlayer should confirm compatibility before installation.

Insulated Glass Units and Thermal Performance

Insulated glass units combine two or more glass panes separated by a sealed space. Low-E coatings and glass compositions can be selected to address the building’s thermal and solar requirements. An IGU can also incorporate a laminated pane when the specified assembly calls for it.

Coastal projects in Florida and on Oregon’s coast may have different heating, cooling, and solar-control priorities. The glass specification should reflect those priorities together with the orientation and size of the glazed area.

Coordinate the unit thickness with the frame’s glazing capacity and select glazing materials compatible with the IGU edge seals. Thermally broken aluminum framing can reduce heat transfer through the frame. Thermal performance and durability under marine exposure still need to be evaluated separately.

Laminated glass and insulated glass units can be combined in the same assembly. Glass composition, edge detailing, and compatible glazing materials should address the project’s safety and thermal requirements.

Managing Water at Windows, Doors, and Glazed Facades

Operable Windows and Glass Entrances

At an operable opening, water management involves the sash seals, sill, drainage outlets, and the connection to the surrounding wall. Water entering a designed drainage channel needs a clear route out. Tracks and drainage openings must remain accessible so accumulated debris can be removed.

PRL Max Windows includes fixed, awning, and casement configurations with thermally broken aluminum framing. For a waterfront residence in Seattle, one design approach could combine fixed glazing for views with operable windows where ventilation is needed. Each configuration brings different hardware and sealing details to the review.

PRL states that test results vary with window type, dimensions, and glass configuration. Use the documentation applicable to the proposed unit when comparing its air, water, structural, and thermal performance with the project criteria.

Glass entrances need particular attention at floor level. Detail the threshold, adjacent terrace or paving, and waterproofing together. Where a low threshold is proposed, resolve drainage and accessibility requirements with the project team before fabrication. Sliding systems also need access for cleaning tracks and inspecting their drainage provisions.

Storefront and Curtain Wall Assemblies

An exposed commercial entrance in Charleston or a hospitality project on Georgia’s coast may involve storefront framing, aluminum doors, sidelites, and adjoining facade panels. Drawings should show how these elements connect and where responsibility for perimeter waterproofing begins and ends.

PRL aluminum storefront systems bring together entrance doors, glazing, and framing for commercial applications. Where standard storefront cannot meet the required dimensions and loads, PRL curtain wall systems provide additional options to evaluate against the project requirements.

For either approach, show the drainage paths, frame joints, anchors, and perimeter seals in the project details. The connection to the surrounding wall needs its own installation details. Review these with the installation team, including transitions at the top, sides, and bottom of each opening, and confirm who is responsible for the adjoining waterproofing.

What to Confirm Before Requesting a Coastal Project Quote

A useful quote request describes the opening, its exposure, and the required performance. Provide the following information when available:

  • Location and exposure: Project address, proximity to salt water, building height, elevation orientation, and sheltered or exposed conditions.
  • Dimensions and application: Opening sizes, quantities, system type, and fixed or operable configurations.
  • Glass makeup: Proposed thicknesses, laminated composition, IGU thickness, and coatings.
  • Finishes and hardware: Aluminum finish, exposed hardware requirements, and any maintenance-access constraints.
  • Performance criteria: Required structural, air, water, thermal, and impact performance, where applicable.
  • Installation details: Wall construction, anchorage substrate, thresholds, perimeter connections, and available drawings.

Identify any selections that remain open so they can be discussed before fabrication. The supplier also needs to know which documents or approvals the project requires for the proposed configuration.

Planning a coastal building or renovation? Contact PRL with your opening dimensions, system type, proposed glass makeup, exposure conditions, and performance requirements to discuss glass and aluminum options for your project.

Door operation, panel position and railing configuration influence how much clear passage and visual continuity remain available in a small home

How Glass Can Make a Small Home Feel More Open Without Adding Square Footage

Home / 2026 / October

A small living room stays the same size when an opaque door is replaced with a clear glass door, even though the patio is now visible from the sofa.

Any renovation that incorporates glass needs to balance open views and privacy. Not every room needs to be visible, and a transparent partition can leave the inside of a bedroom, bathroom, or office too exposed.

Bathrooms, offices, stairways, and hallways offer different places to use glass. In each area, glass can serve a different purpose: letting light through, keeping a partition from blocking the view, or providing privacy when needed. The space that needs to remain clear around a door depends on how it opens.

Glass doors can extend sightlines from a small living area toward a patio while maintaining a physical separation between indoor and outdoor spaces.

Why Glass Can Make a Small Home Feel More Open

With a transparent partition between a living room and a dining room, the view continues beyond the partition. The table and chairs are still visible from the living room. If there is a wall close behind the glass, that wall will still determine how far you can see.

Light from a window in an exterior wall can pass through a glass door or partition into an adjacent area. The amount of light that reaches that second area depends on the size of the exterior opening, any obstructions between the two areas, and the type of glass used.

For doors or windows of the same size and with the same panel layout, narrower frames take up less of the opening, leaving more of the glass visible.

Where to Use Glass to Make a Small Home Feel More Spacious

Glass can be used in a shower, an office, a stairway, a hallway, or a doorway to the patio. In some cases, it helps keep views open; in others, it allows you to separate an area, keep a passage clear, or maintain privacy.

A shower curtain hides the shower even when no one is using it. A clear glass shower door or fixed panel keeps the tile and back wall visible. If the sink is nearby, there needs to be enough space for the door to open without hitting it.

A glass partition with a door separates an office from the living room, allowing the work area to be closed off without adding an opaque wall. The partition needs to be positioned so there is enough room to move the chair and enter or leave comfortably.

When a stair railing interrupts the view, a glass railing system can keep the landing or part of the dining room visible. The steps, columns, and other structural elements will remain in place.

When a door obstructs a hallway as it swings open, a sliding door moves its panel to the side instead of into the walkway. Check where the panel will remain when the door is open and how much clear width will be available for walking through.

In a room next to a patio, a window provides an outdoor view. If the room also needs access to the patio, a sliding door or folding door may be an option, depending on the space available for the panels to move or stack.

Clear shower panels and interior glass partitions can keep compact rooms visually connected while addressing access, privacy and door clearance.

How to Choose Glass and Doors Based on Views, Privacy, and Space to Walk Through

Clear glass maintains a clear view of what is on the other side, while frosted glass blurs shapes and details. The choice depends on how much you want to see and how much privacy is needed on each side of the partition.

In an office or bedroom where privacy needs change throughout the day, Switch-It Privacy Glass can switch from transparent to opaque using an electrical control. In its opaque state, it limits direct views while still letting light through, and shadows may remain visible.

Where a folding door’s panels stack depends on the system’s configuration. Before choosing one, check how much space the open panels will occupy and whether they will interfere with furniture or areas people walk through.

The width available to walk through can differ between two doors, even when they fit openings of similar size. Along with the overall dimensions of the opening, check how many panels the system will have, which ones will move, and where the panels will sit when the door is open.

Space or Need

Possible Glass Application

What to Check Before Choosing

Small bathroom

Glass shower door or fixed glass panels

Opening dimensions, door clearance, and compatibility of the glass type and thickness with the hardware

Office separated from the living room

Glass partition with a door

Glass compatibility with the frame; power supply and control locations if using Switch-It

Stairway or landing

Railing system with glass panels

Whether the glass, supports, and anchors meet the project’s safety requirements as a complete system

Hallway with limited space for a door to open

Sliding glass door

Clear width for walking through, panel position when open, and possible interference with nearby doors

Room next to a patio

Window, sliding door, or folding door

Project requirements for the assembly’s wind resistance, water penetration, and thermal performance

Before deciding on a change, look at the bathroom from the doorway, the stairway from the dining room, or the office from where you usually sit. Notice what blocks the view, how much space a door needs to move, and which areas require privacy. This helps you determine whether to change a door, a partition, a railing, or an opening to the outdoors.

If you are considering where to use glass in a small home, share with PRL which area you want to modify, what you want to keep visible, and where you need more privacy. The team can then help you review which type of glass and opening system best fit the project.


Standard Shower Sizes & Enclosure Planning | PRL

Standard Shower Sizes: Dimensions, Layouts and Glass Enclosure Planning

Home / 2026 / October

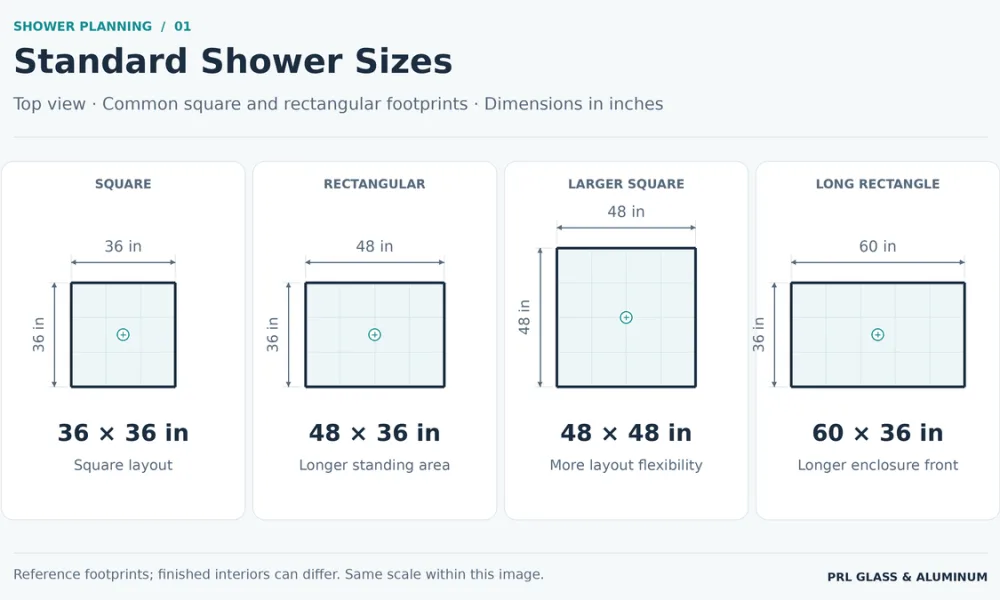
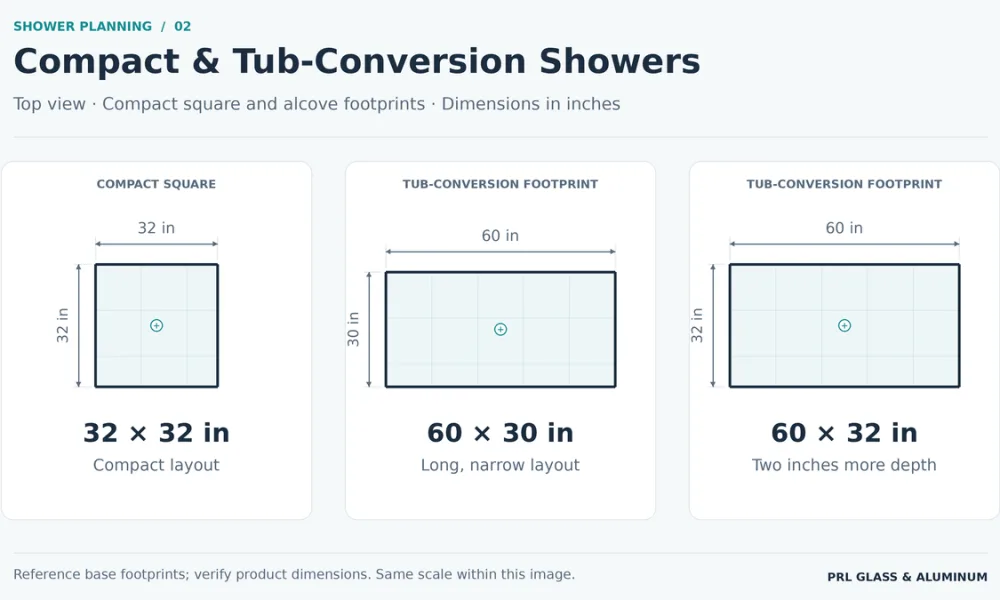
Standard shower sizes include 36 × 36-inch square layouts and rectangular options such as 48 × 36 and 60 × 36 inches. A 32 × 32-inch footprint is a compact option, while 60 × 30 and 60 × 32-inch bases are available for some tub-to-shower conversions. Custom tiled showers can use other dimensions to suit the bathroom.

A square shower, a longer rectangle and a corner enclosure can occupy similar floor areas while providing different standing spaces and entrances. The glass layout determines where the user enters and how the door operates around nearby fixtures. Plan the shower footprint and its enclosure together.

Top-view comparison of 36 × 36, 48 × 36, 48 × 48 and 60 × 36-inch shower footprints, with dimension arrows showing their relative widths and depths.

What Are Standard Shower Sizes?

The table below compares shower footprints and their uses. Each pair of measurements describes the sides of the footprint; the bathroom plan establishes which side receives the entrance. For a prefabricated base or stall, use the manufacturer’s drawing for its actual dimensions and installation requirements.

Shower footprint

Typical layout or application

Practical difference

32 × 32 inches

Compact square shower

Uses a small footprint, with limited room to turn or add seating

36 × 36 inches

Square shower

Provides more space in both directions than a 32-inch square

48 × 36 inches

Rectangular shower

Adds length while retaining a 36-inch side

48 × 48 inches

Larger square shower

Allows more flexibility for entry placement and seating

60 × 30 or 60 × 32 inches

Some tub-to-shower conversions

Uses a long, relatively narrow footprint

60 × 36 inches

Longer rectangular shower

Provides more depth than a 60 × 30-inch layout

72 × 48 inches

Larger custom layout example

Offers room to explore separate standing and seating areas

A nominal product size identifies a base or stall; finished interior dimensions describe the space between the completed walls and enclosure. Use the finished interior when comparing room for movement and seating.

Comparing Shower Width and Floor Area

A 36 × 36-inch finished interior contains 9 square feet. Increasing one side to 48 inches produces a 48 × 36-inch interior with 12 square feet: 3 additional square feet and an extra foot in one direction. That change creates a longer standing area without widening both sides of the shower.

A 48 × 48-inch interior provides 16 square feet. Its square shape offers different entrance and bench positions from a long, narrow rectangle. Floor area alone does not show how much room is available in each direction.

For a bathroom with a limited distance between the shower and vanity, the narrower side may determine what fits. Where the room has a long open wall, a rectangular layout may use that space more effectively. Compare the outline on the bathroom plan before choosing the enclosure.

Minimum Shower Dimensions and Finished Interior Space

For residential work governed by the 2024 International Residential Code, Section P2708.1, the general rule requires at least 900 square inches of interior cross-sectional area and a minimum finished interior dimension of 30 inches. A 30 × 30-inch square illustrates that general minimum.

The section also includes an exception allowing a minimum dimension of at least 25 inches where the interior cross-sectional area is at least 1,300 square inches. Other provisions still apply. Confirm the locally adopted code and amendments before using either rule to establish the project dimensions.

Meeting the minimum dimensions does not establish comfort for every user. Turning, raising the arms, reaching the controls and using a seat all require space within the finished enclosure.

The code measurements refer to the finished interior. In new construction, wall backing, waterproofing and tile change the position of the completed surfaces. Use the actual wall assembly to establish those dimensions rather than subtracting a standard allowance from the framing.

Walk-In Shower Dimensions: Enclosed and Doorless Layouts

Rectangular footprints such as 48 × 36 and 60 × 36 inches are options for walk-in showers, alongside square and custom layouts. The entrance can be on the long side or at one end. Its position affects the route to the showerhead, controls and seating.

In everyday use, “walk-in” commonly describes a shower entered without climbing over the side of a bathtub. Doorless describes an open entrance, while curbless describes an entry without a raised curb. A walk-in shower can have a glass door and a curb; the term alone does not establish accessibility.

Walk-In Showers with Glass Doors

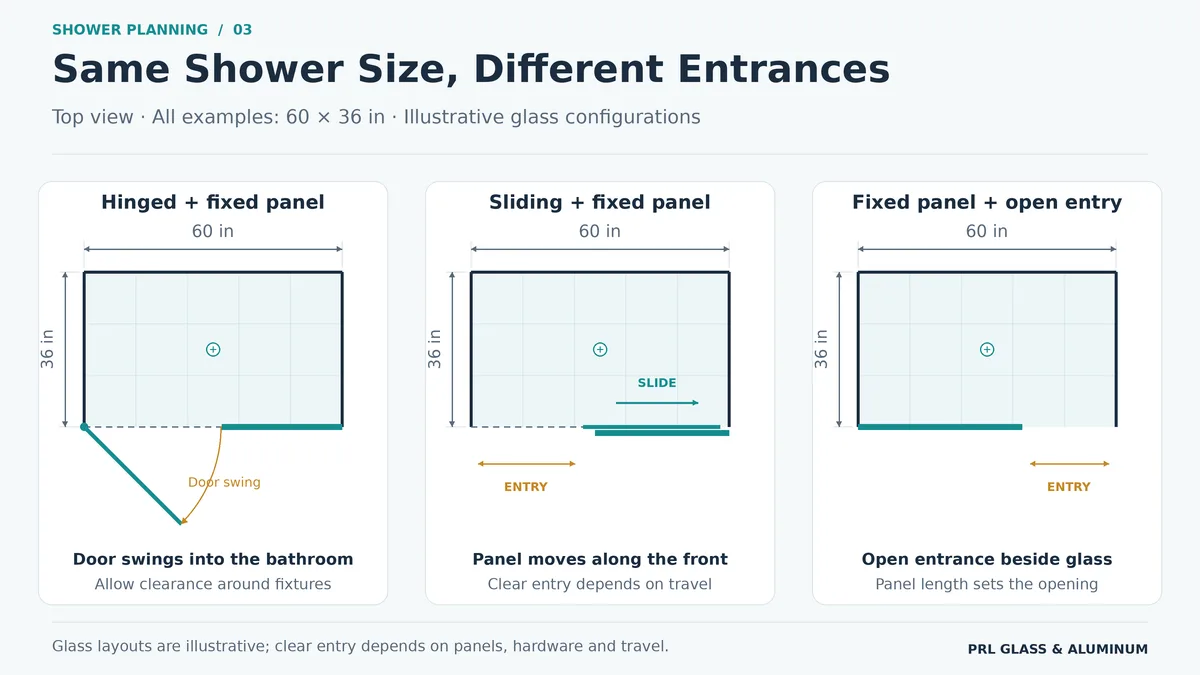
A door allows the entrance to close during use. For example, a 60 × 36-inch shower with its entrance on the 60-inch side may use a door beside fixed glass or a sliding arrangement. Placing the entrance at the 36-inch end creates a different enclosure and approach.

Place the controls where they can be reached from the intended approach. If fixed glass separates the entrance from the controls, the user may need to step farther inside to turn on the water. The showerhead position also helps determine which portion of the front should open.

Doorless Showers and Water Containment

In a doorless shower, the layout must limit water reaching the open entrance. The direction of the spray, distance to the opening, fixed glass, floor slopes and drainage all affect that result. There is no single shower depth that prevents splashing in every arrangement.

A fixed panel can shield the entrance from direct spray. Extending it along the shower front leaves less width for entry, so panel length must accommodate both water shielding and access. In a narrow bathroom, an open entrance may require changes to the shower orientation or nearby fixtures.

Curbless construction introduces a separate floor detail: the shower and bathroom meet without a raised curb. That transition requires coordinated waterproofing and drainage, whether the enclosure has a door or an open entrance


Top-view diagrams of a compact 32 × 32-inch shower and 60 × 30 and 60 × 32-inch tub-conversion footprints, showing differences in shape and depth.

Small and Corner Shower Dimensions

Small Shower Dimensions

A 32 × 32-inch shower occupies less space than a 36 × 36-inch square, but it also leaves less room for turning and arm movement. Where the bathroom allows it, comparing both footprints on the plan helps show whether the extra space can be accommodated without obstructing other fixtures.

The entrance must fit around the toilet, vanity and bathroom door. A hinged shower door may strike a vanity corner or handle; a sliding enclosure avoids that swing but needs enough front width for its panels to travel. The smallest footprint is therefore only one part of the space-saving decision.

Clear glass can preserve the view across a small bathroom, making the shower feel less visually separated from the room. Physical clearance for the user and door must still be included in the layout.

Corner and Neo-Angle Shower Dimensions

Corner showers can have square, rectangular or angled fronts. Nominal neo-angle base sizes include 36 × 36, 38 × 38 and 42 × 42 inches. These dimensions describe the base along the walls; the angled front changes the interior outline and the segment available for the door.

A 36 × 36-inch neo-angle base should not be assumed to provide the same interior area as a 36 × 36-inch square. The clipped corner removes part of the square footprint. Base drawings show the front angle, segment lengths and entrance location needed to select compatible glass.

An angled front may leave a more direct route past the shower toward the vanity or toilet. Its entrance and door movement should be compared with the square or rectangular alternative on the bathroom plan.

Larger Shower Dimensions and Bench Placement

Larger primary bathroom showers can use square footprints such as 48 × 48 inches, rectangles such as 60 × 36 inches or custom dimensions. Allocate the available space to standing, seating and any separate showering positions before deciding how large the enclosure should be.

How a Bench Changes the Available Space

A projecting bench reduces the room available in front of it. As a layout example, in a finished interior 48 inches deep, a bench projecting 16 inches from the back wall leaves 32 inches between its front edge and the opposite enclosure. The entrance, standing position and controls must work with that remaining space.

A corner bench occupies a different part of the layout from a bench extending across the back wall. A folding seat leaves more room when raised and occupies space when lowered. Show the seating in its usable position when evaluating the interior.

Where glass meets a bench, its finished dimensions affect the glass outline and attachment details. Include that junction in the enclosure drawings. Seating in an accessible shower must also meet the requirements for the specified compartment type.

Showers with Multiple Fixtures

Additional showerheads or body sprays should be positioned around the intended standing areas. A large footprint does not establish comfortable spacing for two users: their movement, controls and spray directions must be considered together.

For a custom layout such as 72 × 48 inches, mark the intended user positions and seating on the plan. This shows how much space remains for entering and moving between those areas before the glass panels are divided.

Tub-to-Shower Conversion Dimensions

A tub-to-shower conversion may use a 60 × 30 or 60 × 32-inch base where the existing alcove suits that product. These footprints preserve a long bathing area, but the finished interior and enclosure opening must be established from the selected base and wall system.

Keeping a 60-inch length while increasing the other side from 30 to 36 inches adds 6 inches of depth. Where those are finished interior dimensions, it also increases the floor area from 12.5 to 15 square feet. The bathroom needs room for that extension without compromising nearby fixtures or circulation.

Drain location, plumbing, waterproofing and floor construction are part of the conversion. The existing bathtub footprint can guide the layout, but it does not establish that the existing drain or floor is ready for a shower. Resolve those details before releasing enclosure dimensions for fabrication.

How Shower Dimensions Affect Glass Doors and Panels

The width of the enclosure front is different from the clear opening used to enter. A 60-inch front might contain a door beside fixed glass or overlapping sliding panels. The panel arrangement determines how much of that width is available for access.

With a hinged door beside fixed glass, the clear opening is determined by the door’s operation and hardware. In a sliding enclosure, panel overlap and travel stops also affect the entrance. Compare the clear openings shown in the system drawings before selecting the configuration.

Hinged and Pivot Shower Doors

Hinged and pivot doors need a clear path for the glass and handle during opening. The hinge or pivot position changes that path. Draw the door movement with the vanity, toilet and bathroom door in place to identify collisions before ordering.

Door width and height also affect glass weight. Hinges, pivots and their supporting surfaces must be suitable for the panel. The dimensions of a custom door should stay within the selected hardware’s specifications.

Sliding and Bypass Shower Doors

Sliding doors move along the front of the enclosure, which can help where a swinging door would interfere with fixtures. A bypass arrangement uses overlapping panels; other systems combine a moving door with fixed glass. The entrance location and available opening vary by system.

PRL’s shower slider systems include different panel arrangements and hardware options. Use the selected system’s drawings to establish panel travel, clear entry and permitted glass dimensions rather than estimating the entrance as half the enclosure width.

Fixed Glass Panels

Fixed glass can form a side return, a corner panel or the section beside a door. Its width, height and attachment points define how that portion of the enclosure is built. In an open-entry layout, the exposed edge of the panel also defines one side of the entrance.

Enclosure approach

Main space consideration

Detail to establish

Hinged or pivot door

Clearance for the opening arc

Door and handle movement around fixtures

Sliding or bypass door

Width available for panel travel

Clear entrance after overlap and travel limits

Fixed panel with open entry

Space remaining beside the glass

Entrance width and approach

Corner or neo-angle enclosure

Relationship between angled segments

Door position and movement at the corner

Measurements Needed for a Glass Shower Enclosure

Once the layout is selected, the enclosure supplier needs dimensions for the actual glass opening. Preliminary drawings can support an estimate; fabrication dimensions should reflect the finished surfaces and the selected system.

Record the following:

  • Opening widths and height: Measure the width at the top, middle and bottom to identify variations.
  • Angles and alignment: Identify corner angles, whether walls are vertical (plumb) and whether supporting surfaces are level.
  • Door position and operation: Show the hinge side, sliding direction and intended entrance.
  • Attachment locations: Identify the construction available to support hinges, tracks and clamps.
  • Benches and ledges: Include finished surfaces that meet or affect the glass.
  • Glass and hardware: Establish the glass type, thickness and hardware selections for the system.

Accurate field measurements and sound supporting surfaces are essential to shower door installation. Agree who will verify the opening and release the final dimensions, especially if tile or other finishes are still being installed.


Three illustrative 60 × 36-inch shower layouts compare a hinged door with fixed glass, a sliding door with fixed glass and an open entrance beside a fixed panel.

Accessible Shower Dimensions and Enclosure Planning

Accessible shower dimensions depend on the compartment type and applicable project requirements. A larger shower or a curbless entry alone does not establish compliance. The entrance, adjacent floor space, controls, seating and grab bars must follow the requirements for that configuration.

Section 608 of the ADA Standards identifies these configurations:

  • Transfer-type: 36 × 36-inch clear inside dimensions, measured at the center points of opposing sides; a minimum 36-inch entry; and at least 36 × 48 inches of adjacent clearance, measured from the control wall.
  • Standard roll-in: At least 30 × 60-inch clear inside dimensions; a minimum 60-inch entry on the compartment face; and at least 30 × 60 inches of adjacent clearance.
  • Alternate roll-in: A 36-inch inside width and a minimum 60-inch depth, with a minimum 36-inch entry at one end of the long side. The 36-inch compartment width is an absolute design dimension.

The U.S. Access Board’s bathing room guide illustrates these layouts and related requirements. Glass panels and doors must preserve access and cannot obstruct controls or transfer to a seat. Thresholds and floor slopes must also meet the applicable standards.

Frequently Asked Questions About Shower Sizes

What Is a Standard Shower Size?

Standard size references include 36 × 36-inch square showers and rectangular layouts such as 48 × 36 and 60 × 36 inches. Prefabricated bases are available in several sizes; custom tiled showers can use other dimensions to fit the room.

What Is the Minimum Shower Size?

A 30 × 30-inch finished square illustrates the general IRC minimum of 900 square inches and a 30-inch minimum dimension. Exceptions and local amendments can affect the requirements, so establish the applicable code before finalizing a compact layout.

Is a 32-Inch Shower Too Small?

A 32 × 32-inch shower is a compact option with limited room for turning and arm movement. It may suit a tight layout, but user comfort varies. If space allows, compare it with a 36 × 36-inch option before selecting the base and enclosure.

Can a Walk-In Shower Have a Glass Door?

Yes. A walk-in shower can have a hinged or sliding glass door. A doorless entrance and a curbless floor transition are separate design choices.

Is a 48 × 48-Inch Shower Large Enough for a Bench?

Yes, depending on the bench’s size and position. A corner bench and a bench across the back wall leave different amounts of standing space. Draw the bench within the finished interior and retain a usable route from the entrance to the controls.

Does a 60-Inch Shower Need a 60-Inch Glass Door?

No. The 60-inch dimension may describe the full enclosure front. That front can be divided between a door and fixed glass or between overlapping sliding panels. The individual glass sizes are determined by the selected system and opening.

How Deep Should a Doorless Shower Be?

There is no single depth that prevents splashing in every layout. The distance and direction from the showerhead to the entrance, fixed glass, floor slopes and drainage must be considered together before omitting a door.

PRL supplies shower doors and complete glass enclosures for residential and commercial bathrooms. Share your opening dimensions and intended layout with the PRL team to discuss glass, hardware and enclosure configurations for your project.